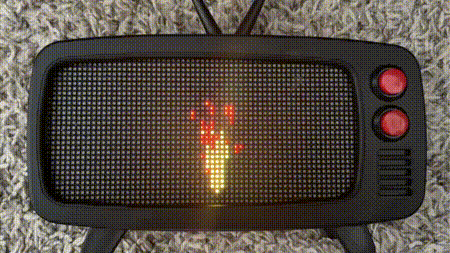
Using my Hub75 MicroPython library from a previous post, I displayed the pixelated version of an animated GIF on an LED matrix.
The basic process is this
- Find a GIF to display (I chose this one https://gifer.com/en/9PrD)
- Split the GIF into individual image files for each frame with FFMpeg
- Encode the image data using the ImageTo3BitList.py tool
This library makes it fairly easy to display any image data on the LED Matrix using Python. There are several drawbacks though. One is the limited 3-bit color palette. Another drawback is that the processor is mostly tied up in driving the display. Too much extra processing will cause display quality degradation. Images with a wide vertical span especially take more time to display and tend to flicker. In the case of the flame animation, the flicker is more of a feature than a bug.
Splitting the GIF
I used FFMpeg to split the GIF into a set of PNG files. The basic command is this:
ffmpeg -i input_image.gif ./output_images/output_image_%02d.pngwhere input_image.gif is replaced with the input GIF file name. The output images will be written to /output_images/ and numbered as output_image_01.png, output_image_02.png, etc…
I also chose to crop the image down a bit to avoid encoding so much black background and save on memory. Here is the actual command I ran on the flame.gif.
ffmpeg -i flame.gif -filter:v "crop=240:480:140:50" ./flame/frame_%02d.pngMore details on the FFMpeg crop filter here.
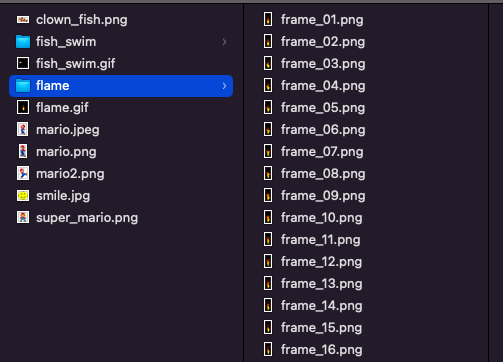
Now I have a directory of PNG images that are ready to become 3-bit encoded python data.
Encoding Image Data
The repo contains a python too called ImageTo3BitList.py which accepts either a single image or a directory of images as input and generates 3-bit encoded image data for use with the Hub75 MicroPython library. From the repo root directory, the basic command to encode data is:
Utilities/ImageTo3BitList.py -i /path/to/images/input_image_dir -o output_data.pyThe output file, output_data.py, will contain the encoded image data for all of the PNG images in input_image_dir. The output_data.py file can be imported in order to display the images at runtime.
The image data can get very large and I ran into memory limitations on the ESP32. In order to scale the images down, the “-r” or “-c” flag can be used to specify the number of output rows or columns. Here is the command I used to encode the flame animation frames scaled down to be 25 rows tall.
Utilities/ImageTo3BitList.py -i images/flame -r 25 -o flame_data.py -n flameAnimating on the LED Matrix
In order to run an animation loop on repeat, the AnimationPlayer class that is found in animation.py can be used. A simple example of this can be found in main_animation.py.
import hub75
import matrixdata
from animation import AnimationPlayer
from flame_32_data import flame
from logo import logo

ROW_SIZE = 32
COL_SIZE = 64

config = hub75.Hub75SpiConfiguration()
matrix = matrixdata.MatrixData(ROW_SIZE, COL_SIZE)
hub75spi = hub75.Hub75Spi(matrix, config)

# Show Python Logo
matrix.set_pixels(0, 20, logo)
for i in range(100):
    hub75spi.display_data()

flame_player = AnimationPlayer(matrix, hub75spi, flame, 0, 26)
flame_player.run_loop()