I created a MicroPython library to drive an LED matrix using an ESP32. The code for this project is hosted on Github.
Hardware Setup
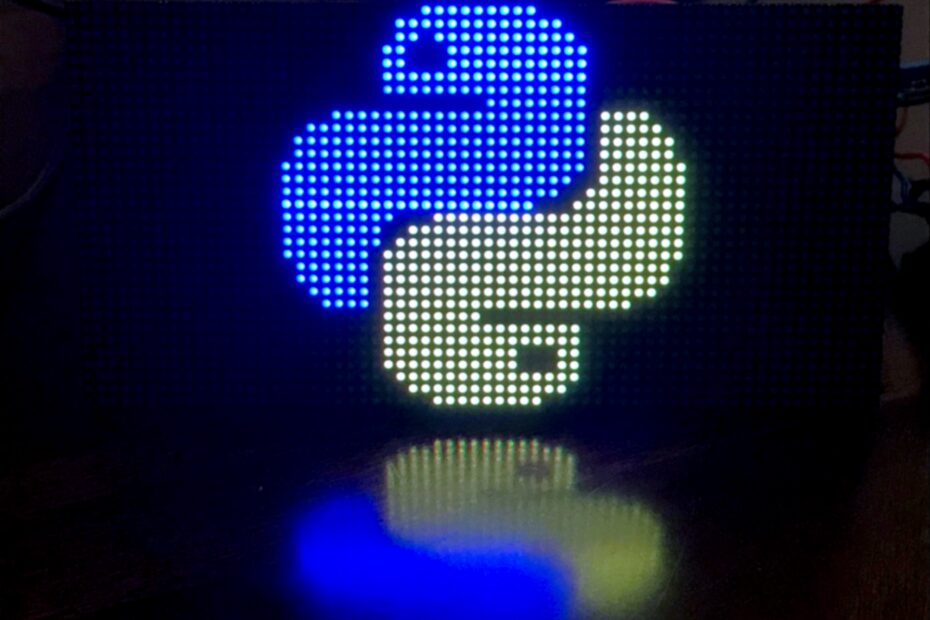
The LED matrix I used is from Hackerbox #65 which also included a PCB designed to connect an ESP32 to the Hub75 interface on the LED matrix. The code is developed around that setup but could be adapted for other pin mappings.

Hub75 Protocol
Hub75 is a common protocol for driving RGB LED matrix displays. There are variations of the protocol but I’ll focus on what is used for my display which is 32 rows x 64 columns. The basic idea of Hub75 is to illuminate two rows at a time; a row on the top half of the display, and the row that is 16 rows down from that one. So at any time row N and row N + 16 are being illuminated. Here are the details:
- Shift out pixel data on 6 data lines (2 rows x 3 colors each) for row N and row N + 16 in sync with the clock pin
- Disable display by pulling the Output Enable Pin high
- Set the row select pins (A through E) to N (A is the least significant bit, and E is most significant bit)
- Set the Latch Pin high then low to latch in the data for displaying
- Enable the display by pulling the Output Enable Pin low
- Wait a short amount of time while the LEDs on rows N and N + 16 light up
The repeat this 16 times (for N = 0 through 15) to display one full frame.
Bit Banging Approach
At first I tried a “bit-banging” approach to shift in 6 channels of data (2 rows x 3 colors) simultaneously and illuminate two rows at a time. Unfortunately, using MicroPython this approach was too slow. The refresh rate was much too slow causing a pretty bad flicker.
SPI Approach
Serial Peripheral Interface (SPI) sends and receives serial data using a separate clock pin to synchronize the sender and receiver. Hub75 also sends synchronous serial data except that it uses six data lines all synchronized to the same clock. So, the drawback of using SPI for the Hub75 driver is that it can only send data for one color of one line at a time. As a result, the library I created actually displays each color of each row individually, (row 1 red, then row 1 green, then row 1 blue, then row 2 red, row 2 green, …. etc) as you can see in the logic analyzer capture below.

This capture was taken while running the bouncing earth example show below. In particular this part of the capture shows the top row of the earth being shifted in. The topmost channel captures the clock. You can easily see the three regions where the clock was running. Each of those regions is shifting in one color for one row. The next capture channel down shows the red pixel data. Since the earth image has only one pixel with red in it there is just one short blip where the red channel goes high for a single clock cycle. There are four pixels that have both blue and green in this row which is why the next two capture channels down (green then blue) go high for longer than red (four clock cycles).
When the next channel down, Output Enable, goes low then the lights come on. The next capture channel down is the latch. When latch goes from low to high then the data which was shifted in actually goes into effect. The last two capture channels are two of the five row select lines. These five row select lines determine which row on the LED matrix will light up when the Output Enable line goes low. The Output Enable goes high to disable the output while latching and also while switching the row select lines.
Because all of this happens so fast, the colors blend together. Though if you slowed the process down enough you would see each color channel flash on a single row, one at a time. While this works, there are drawbacks to the SPI approach. Doing each color and row individually means that each color can only be on for 1/3rd of the time it would be normally be illuminated, and the overall display refresh rate is cut in half. This causes the display to not be as bright. Increasing the illumination time helps with this but increasing it too much will cause the display to flicker.
Conclusion
Is this a great way to drive an LED matrix? No. Was it fun to see how far I can push MicroPython with driving an LED Matrix? Yes it was. Will I use this library in future projects? Very likely. Maybe I’ll combine it with ESP-Now to add remote control. For animation support, check out this post on LED Matrix Animation.
Dear,
I’ve come across your project by recommendation when I asked in the MicroPython Gibthub forum how to improve on the bitbanging speed.
Your approach is great and I have learned a lot! Unfortunately, I cannot use the last column with it, and the bouncing also does not work. Maybe the two problems are related, but I am clueless here.
I’ve tried to find a problem in the code but it seems alright to my eyes. Maybe you can make more of it with the images that I have posted?
https://github.com/orgs/micropython/discussions/10776#discussioncomment-5051233
I’d be happy if you could point me to the right direction here.
Kind regards
Daniel
Thanks for pointing out these issues and providing a fix for the bouncing problem. I made a fix for issue with the right-most pixels and it has been pushed up to the repo.
please..sample project text scrolling horizontal and vertical bro,,
I’ll give it a try if I can find the time. You may want to look at the clock project Daniel created. I don’t know if it scrolls, but it does have number character display and may help you with what you are working on.
https://github.com/danielmader/MatrixClock_MicroPythonESP