I’m starting on course 4 of the Coursera Digital Signal Processing Specialization, which uses a ST Nucleo 64 as part of an application project. My Nucleo came in the mail already and I want to get a development environment setup and be comfortable with compiling and loading programs on the Nucleo.
Install STM32 Cube IDE
The recommended IDE is STM32Cube IDE. I had issues uploading & running a program with the current latest version (1.7.0) so I installed an older version (1.6.1) and was able to upload & run a blink program with that. I also had to change which debugger software to OpenOCD (more on that below)
Create new project
After installing the STM32Cube IDE, I opened it up and created a new project. Then under the “Board Selector” tab I selected my board, the NUCLEO-L476RG. I clicked “Next”, named the project and clicked “Finish”.
Generate and upload
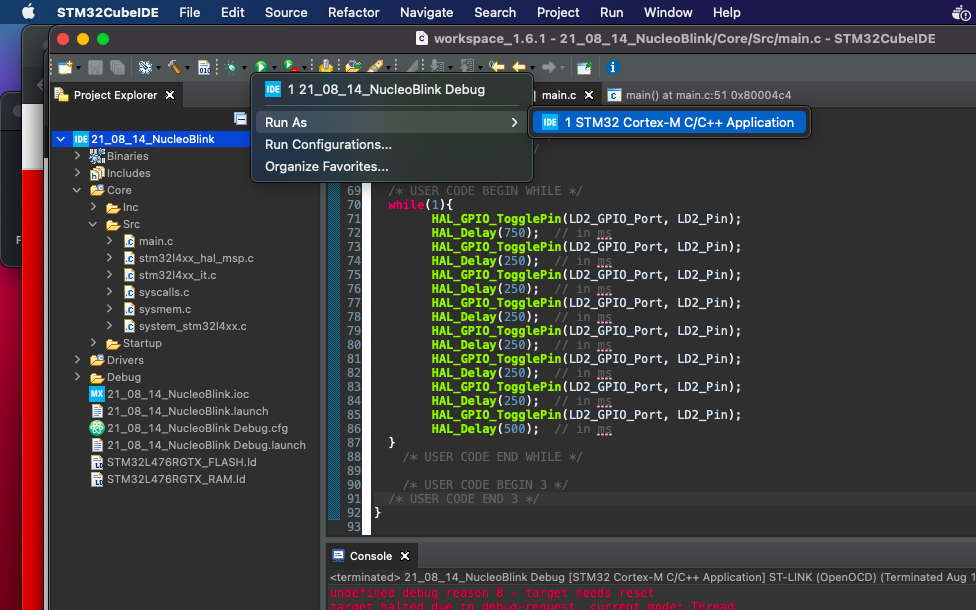
Next I generated the code for my board with Alt+K. That created a bunch of new files including main.c. Then I added some code in the main while loop to make the LED blink. Note that this code does a long blink followed by three short blinks (Morse code for ‘B’). This way I can easily recognize that it is my code running and not a default blink program.
  /* Infinite loop */
  /* USER CODE BEGIN WHILE */
  while(1){
	    HAL_GPIO_TogglePin(LD2_GPIO_Port, LD2_Pin);
	    HAL_Delay(750);  // in ms
	    HAL_GPIO_TogglePin(LD2_GPIO_Port, LD2_Pin);
	    HAL_Delay(250);  // in ms
	    HAL_GPIO_TogglePin(LD2_GPIO_Port, LD2_Pin);
	    HAL_Delay(250);  // in ms
	    HAL_GPIO_TogglePin(LD2_GPIO_Port, LD2_Pin);
	    HAL_Delay(250);  // in ms
	    HAL_GPIO_TogglePin(LD2_GPIO_Port, LD2_Pin);
	    HAL_Delay(250);  // in ms
	    HAL_GPIO_TogglePin(LD2_GPIO_Port, LD2_Pin);
	    HAL_Delay(250);  // in ms
	    HAL_GPIO_TogglePin(LD2_GPIO_Port, LD2_Pin);
	    HAL_Delay(250);  // in ms
	    HAL_GPIO_TogglePin(LD2_GPIO_Port, LD2_Pin);
	    HAL_Delay(500);  // in ms
  }
    /* USER CODE END WHILE */
I hit Cmd + B and the program built without errors. Then I right clicked the project and selected “Run As…” and picked “STM32 Cortex-M C/C++ Application”. This command should upload & run the program.
Change debugger settings
At first, it appeared to upload fine but never ran. Then after a few seconds of nothing happening I would see a message “Debugger connection lost”. Using a solution from this forum I changed the debugger to OpenOCD and set it to use the software reset. After that it the program uploaded and ran just fine.
I also set a break point and used “Debug As…” to step through the code.